Why?
There are a few options available for 4mm shafts and the OMP M2, which can be bought off the shelf.. One common option is the Microheli head with the corresponding swashplate. But we have also looked at less common ones like the Statsrc one from AliExpress:
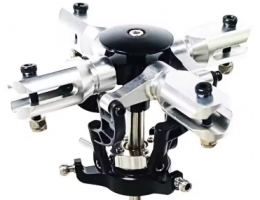
Nevertheless for building scale helis that are even more detailed it would be nice to be able to change small details and also to change the head geometry. We have been 3D printing center pieces for rotorheads, which were then used with aluminum blade grip. This is quite nice, since parts from other helis can be re-used.
Designing an entrie rotorhead has been on out list for quite some time. Although printing it did not happen since we were concerned about mechanical stability of the blade grips.
in the past few months we were ordeing quite a few parts from JLCPCB (PCBs and MJF 3D-printed parts), so we also came across their SLM metal 3D printing service. We just wanted to give it a try and share our experience in this post.
Observations

The part’s surface is quite rough, wich is not a big deal for this application. I did not experct that there is quite significant shriankage.
This is pretty nice actually since the spots for the bearings and the shaf can be re-worked precisely.
This has proven very challending with my tools. Drilling the hole for the shaft went quite okay with our Proxxon FF230. You really need to take your time, secure the part firmly and also make sure to drill perpendicular to the blade plane.
Cutting the threads into the central piece has just been a hughe pain. My tools were barely cutting through the steel and I could only cut 1/4 of a revoluation at a time. The upside: you won’t bea able to break these threads :). To be honest I, I would have to get other tools for doing this.
Re-working the baldegrips to be able to mount the bearings would have been more challenging, since I’ve designed the grips in a way that I would need to drill all the way to the bottom of the bearing position. This wouild also require using a and mill rather than a drill, since the drill has a 118° tip.
After checking the weight and having a very hard time cutting the threads I’ve decided to stop this project and continue with something more promising or maybe give another material a try.


Conclusion
Stainless tool steel is definitely very duarable and very heavy (obviously!). The printed part’s surface is considerably rougher than milling or casting.
This experiment cost about $40 ($8 each part), which is quite okay for getting custom stainless steel parts made. This is definitely cheaper than CNC milling.
The quality of the part is very nice but you have to keep the shrinking in mind. So any areas with tight solerances or high demands in terms of smoothness need to be re-worked.
So when you need to fit bearings keep in mind that you need to be able to mount the part for doing the rework and that you need to havve the proper tools to deal with steel.
So for motor mounts and other small heavy duty parts this may be an option but to be honest I won’t consider this manufacturing technique for my micro heli projects. Maybe I’ll give SLM with aluminum a try ……